Murmur user manual
The same manual is inside the plugin: open it with the Manual button in the top bar.
What Murmur is
Murmur is a real-time granular effect by Audio Tools, for macOS and Windows, as a VST3, an Audio Unit (macOS) and a standalone app. It listens to whatever you feed it (a voice, a guitar, a synth, a drum loop) and turns it into clouds, shimmering pads, frozen chords stretched for minutes, rhythmic stutters and glitches.
Everything that comes in is recorded into a memory of up to 16 seconds. Up to 128 tiny pieces of that memory, the grains, play at the same time, each with its own length, pitch, direction, fade and place in the stereo field. The grains then go through two tone filters, a delay and a plate reverb, and are mixed with your dry signal. You can freeze the memory, feed the grains back into it, scan through it slowly to stretch time, snap the grains' pitch to chords and scales, lock them to your DAW's tempo, move things with two LFOs, and play the grains from a MIDI keyboard.
The window shows all of this as a flock of birds over a horizon: the horizon is the recorded audio and each bird is a grain. A Simple page puts the most important knobs next to the flock; an Advanced page shows every parameter. There are 30 factory presets in eight categories, and you can save your own.
Granular processing in plain words
Imagine a tape recorder that never stops recording, with a loop of tape that holds the last few seconds, and dozens of tiny playback heads touching that tape at once. Each head plays a short slice, from a few milliseconds to two seconds, fading in and out so the slice starts and ends softly. That slice is a grain.
When the grains are short and many, you no longer hear the slices: you hear a cloud, a smear of the original sound. When they are long and few, you hear overlapping echoes of phrases. When each grain plays a little higher or lower, the cloud becomes a chord or a shimmer. When every grain starts on a beat, the cloud becomes a rhythm. When the tape stops recording (Freeze), the grains keep playing what was there, so a chord can last forever. And because the speed at which the heads travel along the tape is independent of the pitch they play at, you can stretch a sound ten times longer without making it deeper.
Almost every control answers one of three questions about the grains: how long and how many (Size, Density), where in the memory they read (Position, Spray, Scan), and how they sound (pitch, direction, envelope, pan). The rest is what happens to the cloud afterwards: filters, feedback, delay, reverb and the balance with the dry sound.
Installing
Murmur comes as a VST3 plugin, an Audio Unit (macOS only) and a standalone application. It runs on macOS 11 or later (one universal binary for Apple silicon and Intel) and on 64-bit Windows 10 or 11.
On macOS:
- Unzip the download.
- Copy
Murmur.vst3to~/Library/Audio/Plug-Ins/VST3. - Copy
Murmur.componentto~/Library/Audio/Plug-Ins/Components. - Rescan plugins in your DAW (Ableton Live: Settings, Plug-Ins, Rescan).
On Windows:
- Unzip the download.
- Copy
Murmur.vst3toC:\Program Files\Common Files\VST3(this needs administrator rights). - Rescan plugins in your DAW.
Murmur.app (macOS) and Murmur.exe (Windows) are the standalone version.
Loading it in a DAW
Murmur is an audio effect (a music effect in the Audio Unit list) and goes on anything that carries audio.
- On an audio track: Mix sets the balance between the dry track and the grains.
- On a return (aux, bus) track: send several tracks to it and set Mix to 100 %, so the return carries only grains.
- On a group or the master it works too, but a cloud on a full mix gets busy quickly.
Murmur accepts mono or stereo input and gives mono or stereo output. A mono input is copied to both sides before the grains are made, so the result can still be wide. Murmur adds no latency: the dry signal passes straight through and the grains always read audio that has already arrived. When you bypass it, the dry signal passes untouched. It tells the host its tail lasts 20 seconds, so feedback, reverb and frozen clouds are not cut off.
In Ableton Live, drag Murmur onto an audio track, or onto a return track (Create, Insert Return Track). On a return, set Mix to 100 % and turn up the Send knobs of the tracks you want to process.
Sending MIDI to Murmur
The MIDI modes and the sustain pedal need notes. The audio still comes from the track Murmur sits on; the notes come from a separate MIDI track. In Ableton Live:
- Create a MIDI track next to the track that holds Murmur.
- In the MIDI track's I/O section, set MIDI To to the track that holds Murmur.
- In the chooser below it, pick
Murmur(the device). - Arm the MIDI track or set its Monitor to
Into play from your keyboard, or write a clip on it. - In Murmur, set MIDI Mode (Advanced page, Effects and MIDI panel) to
PitchorGate.
When notes arrive, the top-left corner of the flock view shows how many are held. In other DAWs, look for how they send MIDI to an effect plugin. If a DAW cannot, everything except the MIDI modes and the sustain pedal still works.
The standalone app
The standalone processes the input of your audio interface. Use the Options button at the top of its window, then Audio/MIDI Settings, to choose the input, the output and a MIDI keyboard. On macOS it asks for permission to use the microphone, because the input is what Murmur turns into grains.
First sound
- Load Murmur on a track with a sustained sound: a vocal, a guitar, a pad or a piano.
- Click the preset name in the top bar, open Clouds and choose First Murmur.
- Press Play in your DAW.
Birds appear over the horizon and you hear a soft cloud of grains under your dry track. Turn Size up to blur the grains into a cloud, Spray up to scatter them across time, and Pitch to +12 to lift the cloud an octave. Then press Freeze and stop the music: the cloud keeps singing what it heard last. Press Freeze again to let new audio in.
The interface at a glance
The window has a top bar, a page area and a help bar at the bottom. It can be resized from the corner, from half to one and a half times its normal size, and keeps its proportions.

The top bar, from left to right:
- murmur: the logo.
- in and out: the input and output meters. They turn coral when the level reaches full scale.
- < and >: the previous and next preset, factory presets first and then yours.
- The preset name: click it to open the preset menu, with one submenu per category and your presets under User.
- Save: saves the current settings as a user preset.
- Simple and Advanced: switch between the two pages.
- Manual: opens this manual inside the plugin.
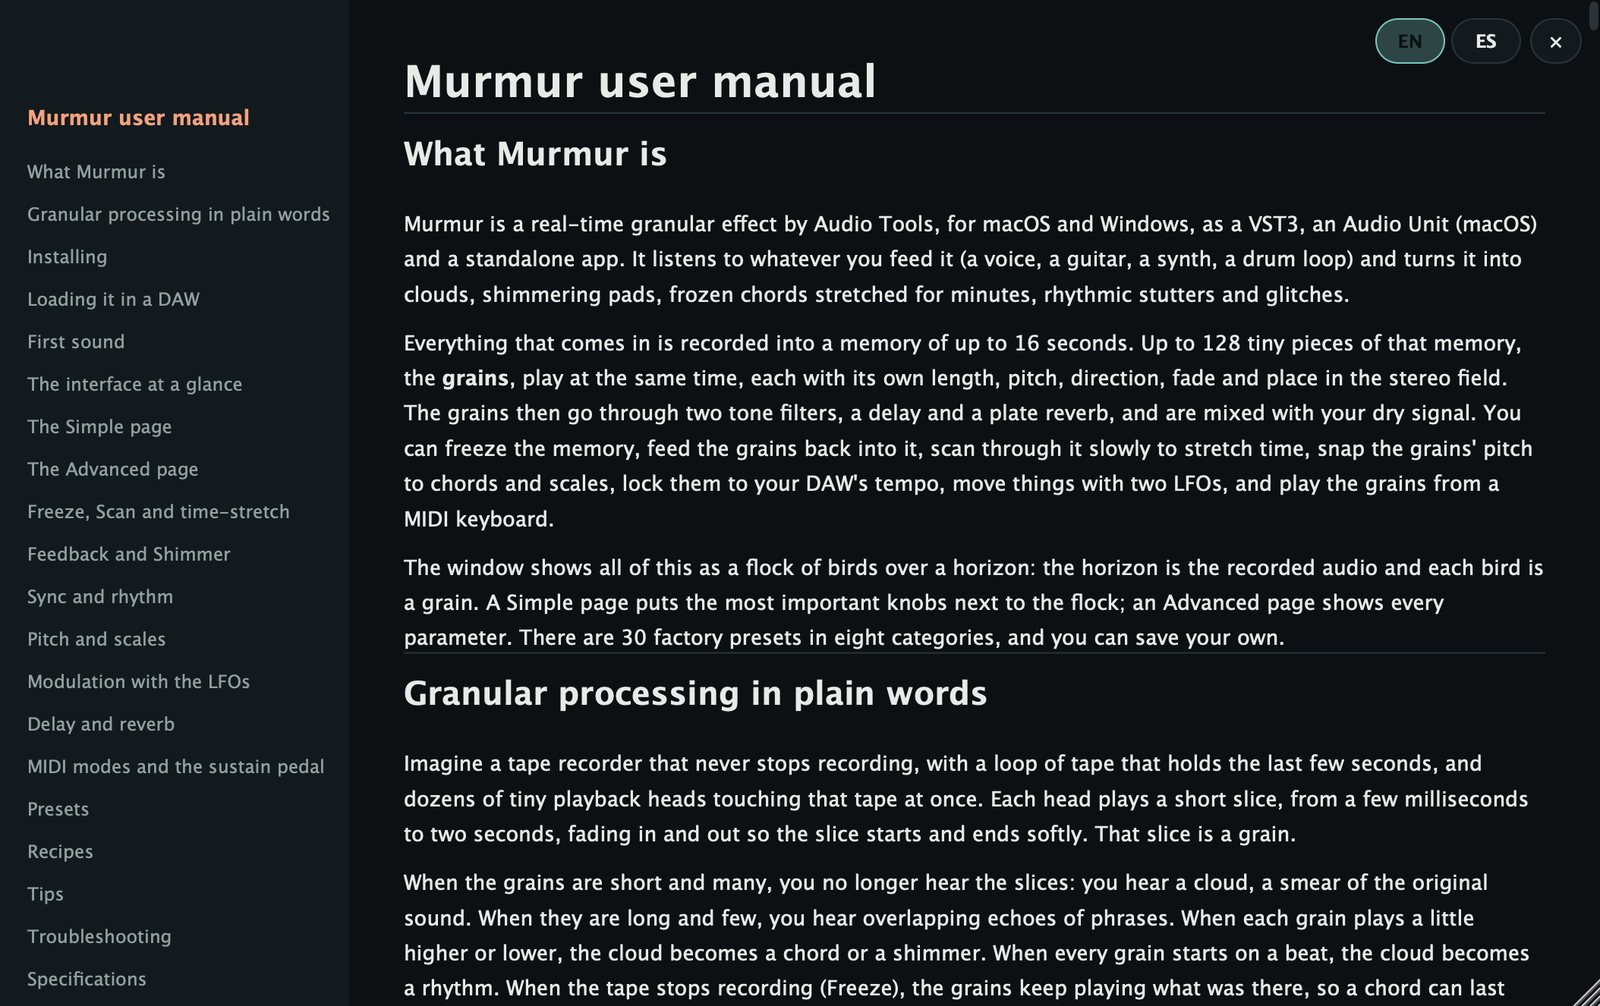
The help bar shows the name of the control under the mouse and a sentence about what it does. Otherwise it shows Hover over a control to see what it does and the CPU load: the share of one processor core that Murmur is using.
The controls work the same everywhere:
- Round knobs: drag up or down. Hold Shift for fine steps, double-click to return to the default, or use the mouse wheel. The value is written in the middle of the knob.
- Boxes with a small triangle: click to open a menu of choices.
- Boxes with two states (Freeze): click to switch.
Every setting is also a host parameter that you can automate. In the host, LFO settings carry their number (LFO 1 Rate) and effect settings their full names (Delay Feedback, Reverb Damping).
The Simple page
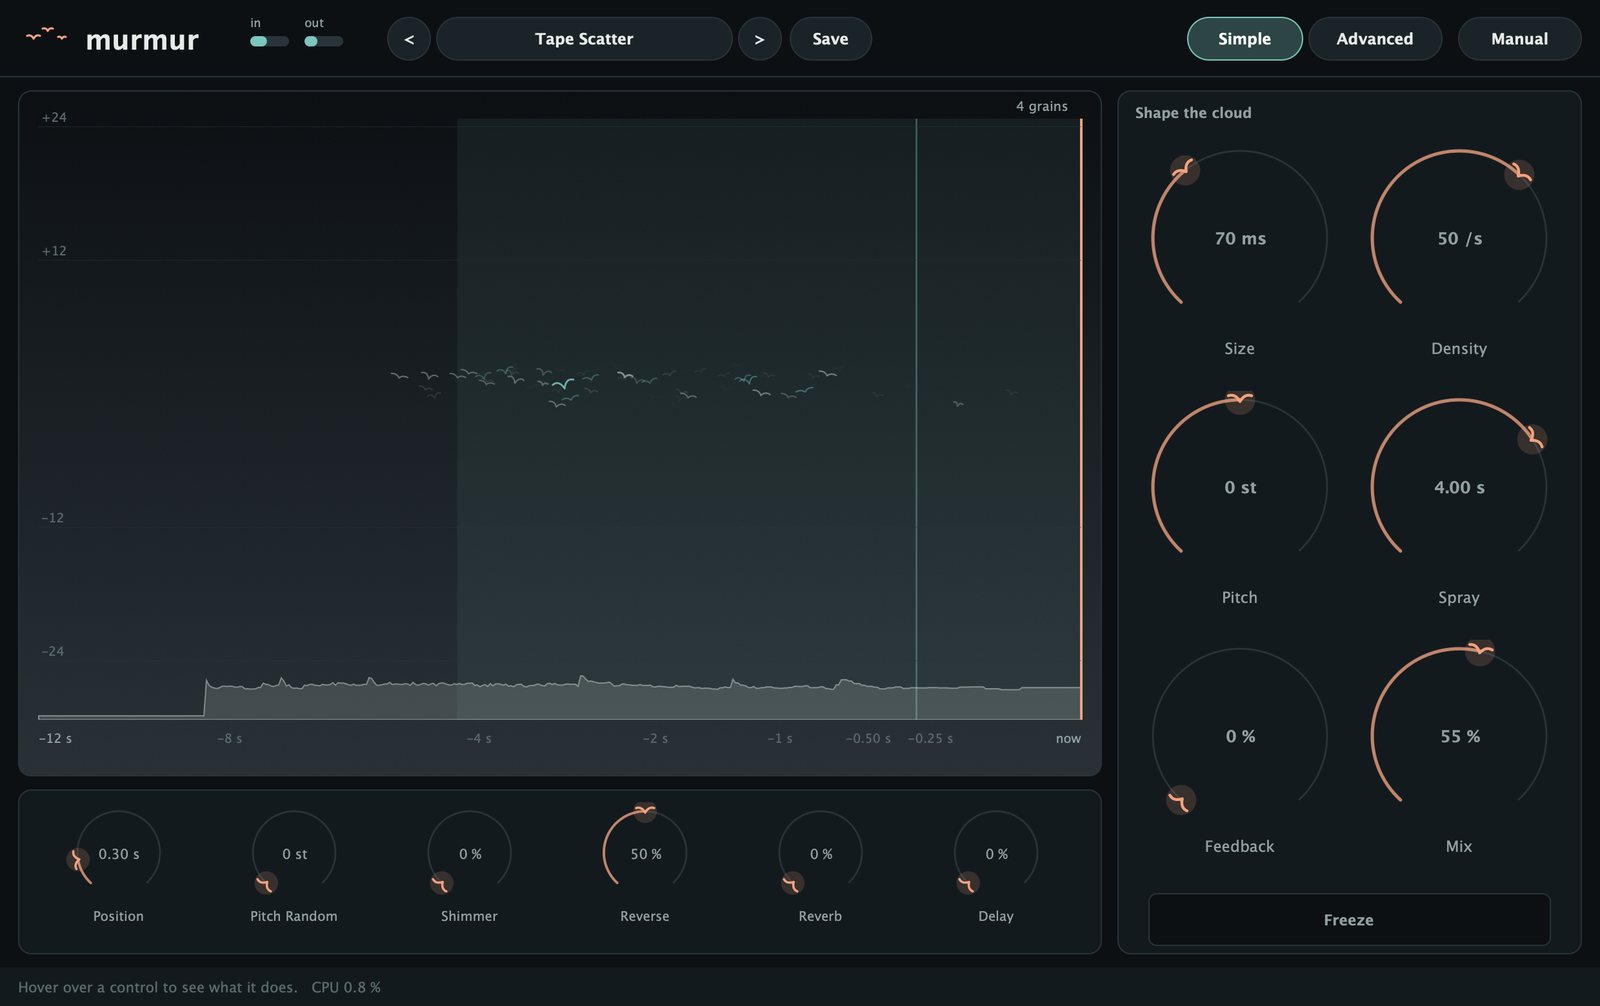
The Simple page holds the flock view on the left, a row of six small knobs under it, and the "Shape the cloud" panel on the right with six big knobs and Freeze.
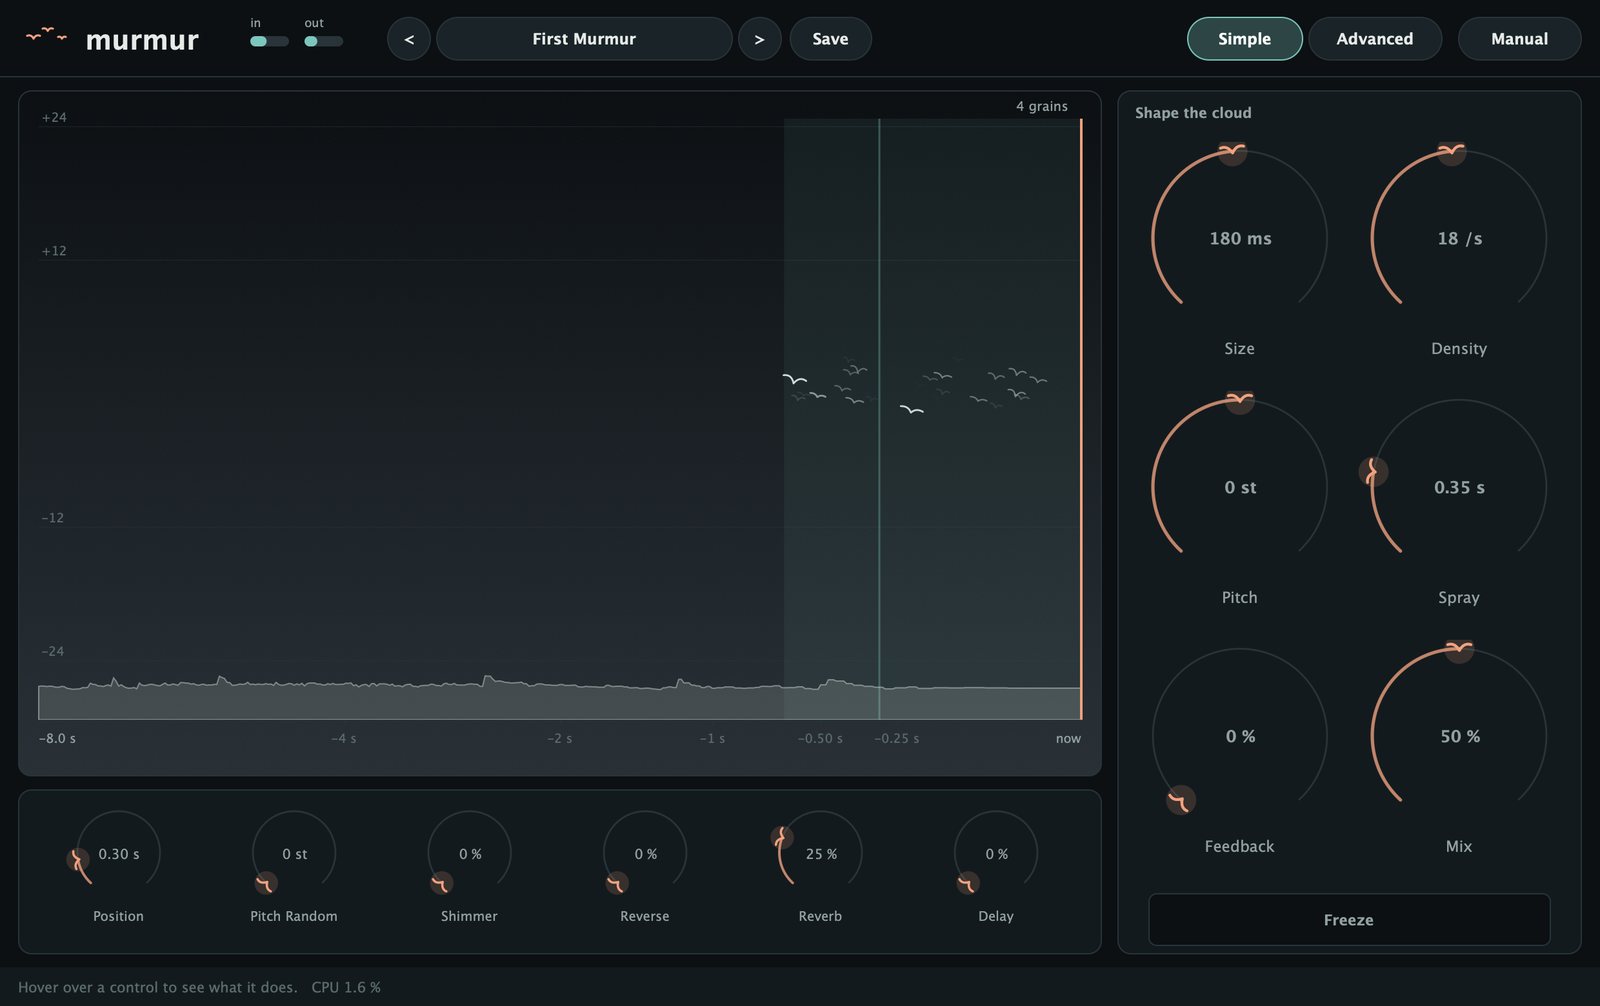
Reading the flock view
- The horizon is the waveform of the recorded audio: the newest audio on the right, at the line marked
now, the oldest on the left, at the length of the buffer (for example-8.0 s). The time axis gives the last seconds more room; the marks-0.25 s,-0.50 s,-1 s,-2 s,-4 sand-8 sshow the scale. - The coral line on the right is where new audio is recorded. When Murmur is frozen, the line and the waveform turn sea-green and the label reads
frozen. - The light band is where new grains are born: Position plus and minus Spray. The thin line inside it is Position itself.
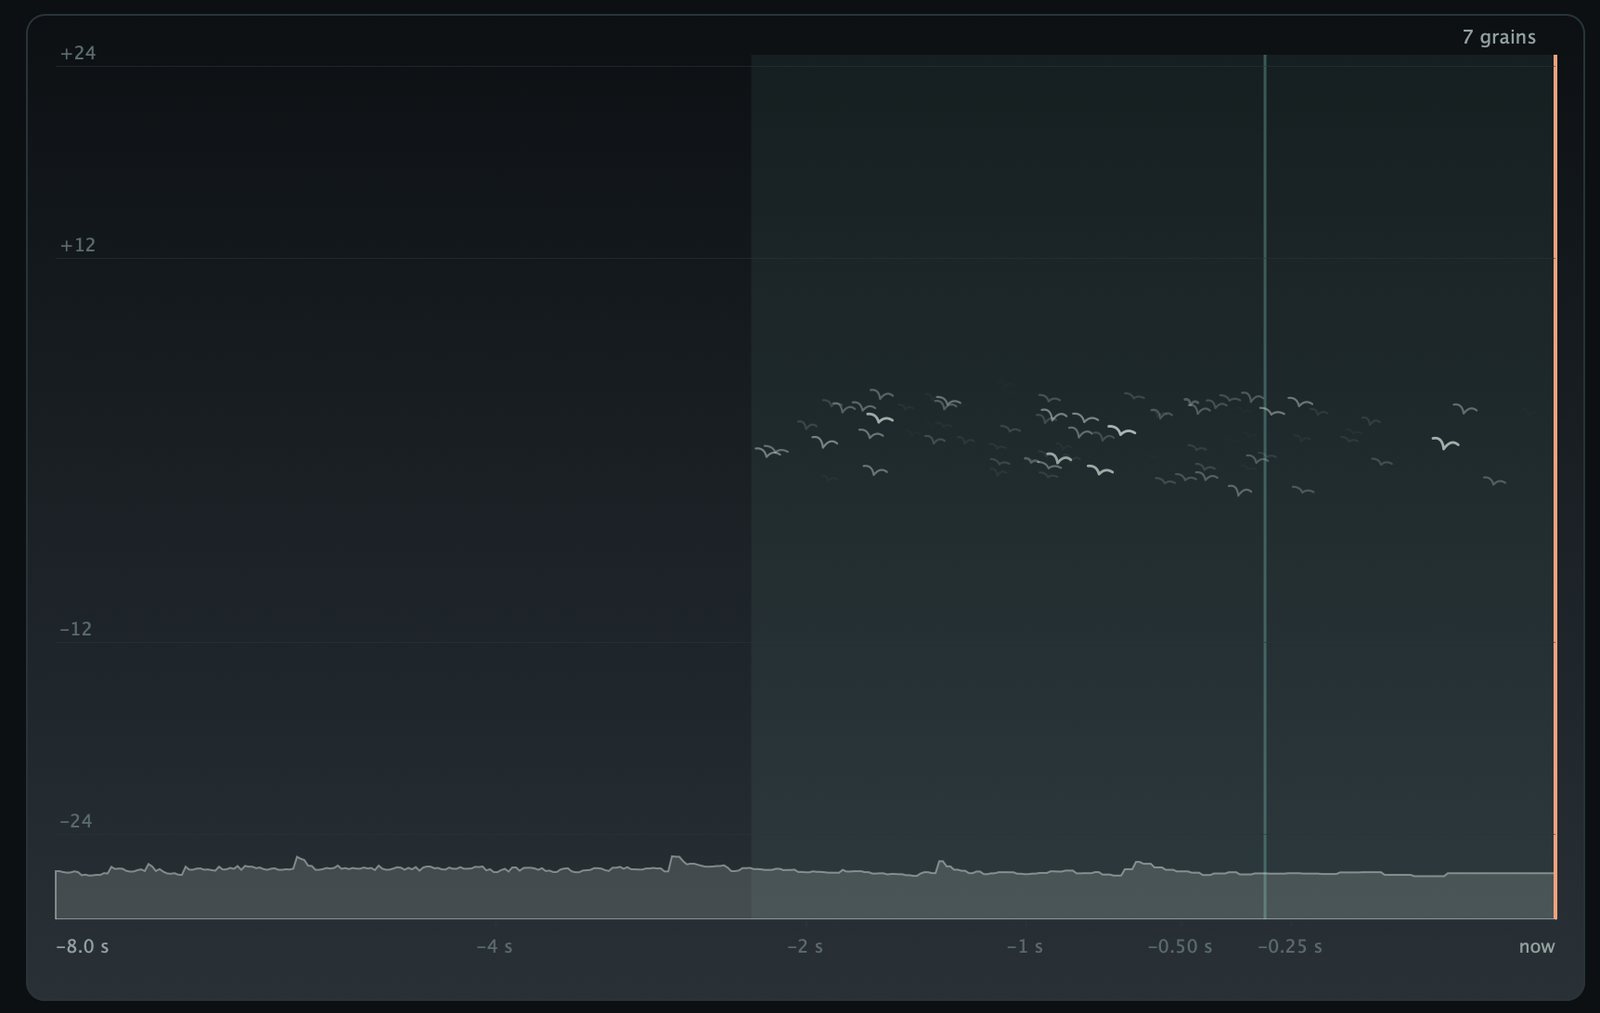
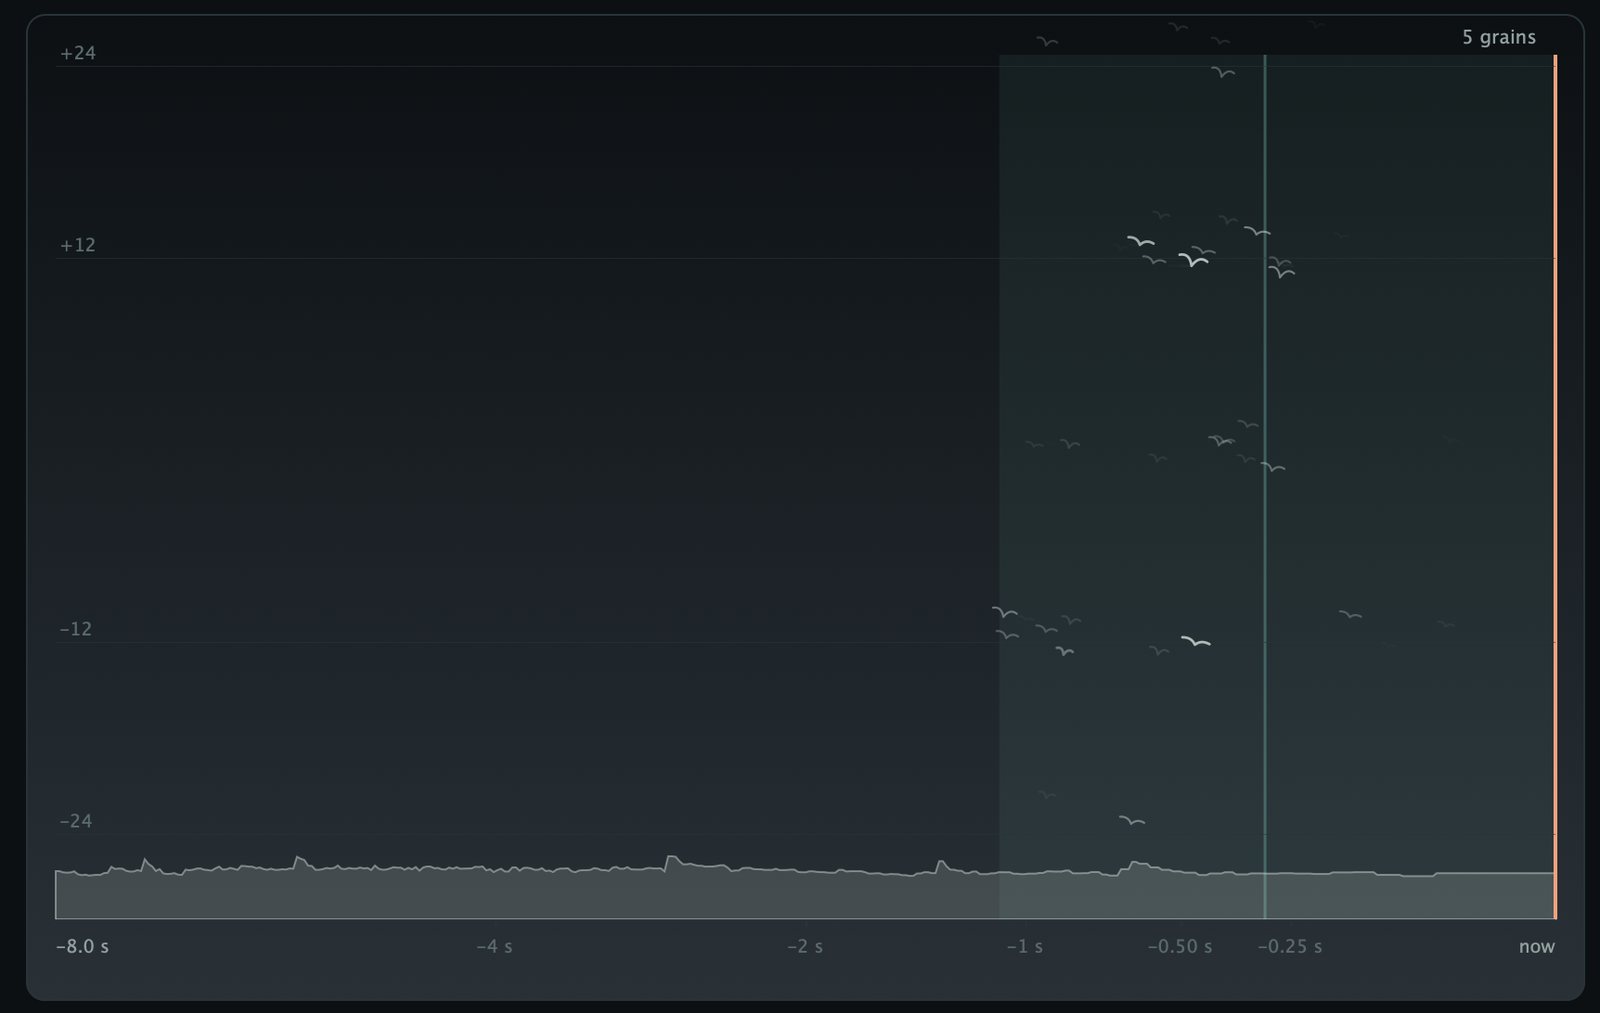
- Each bird is a grain. Its horizontal place is the moment of the buffer it is reading now. Its height is its pitch: the middle is the original pitch, and faint lines mark +12 and +24 semitones above and -12 and -24 below. Birds sit slightly higher or lower depending on their pan.
- The size and brightness of a bird follow its envelope: it grows as the grain fades in and shrinks as it fades out. Sea-green birds tilted the other way are reversed grains.
- The trails show where each grain has been. While recording, a grain at the original pitch stays in place, because it reads at the same speed as new audio arrives; higher grains drift right, lower and reversed ones left. When frozen, normal grains travel right.
- The counter at the top left shows how many grains are playing, and how many MIDI notes are held.
Shape the cloud
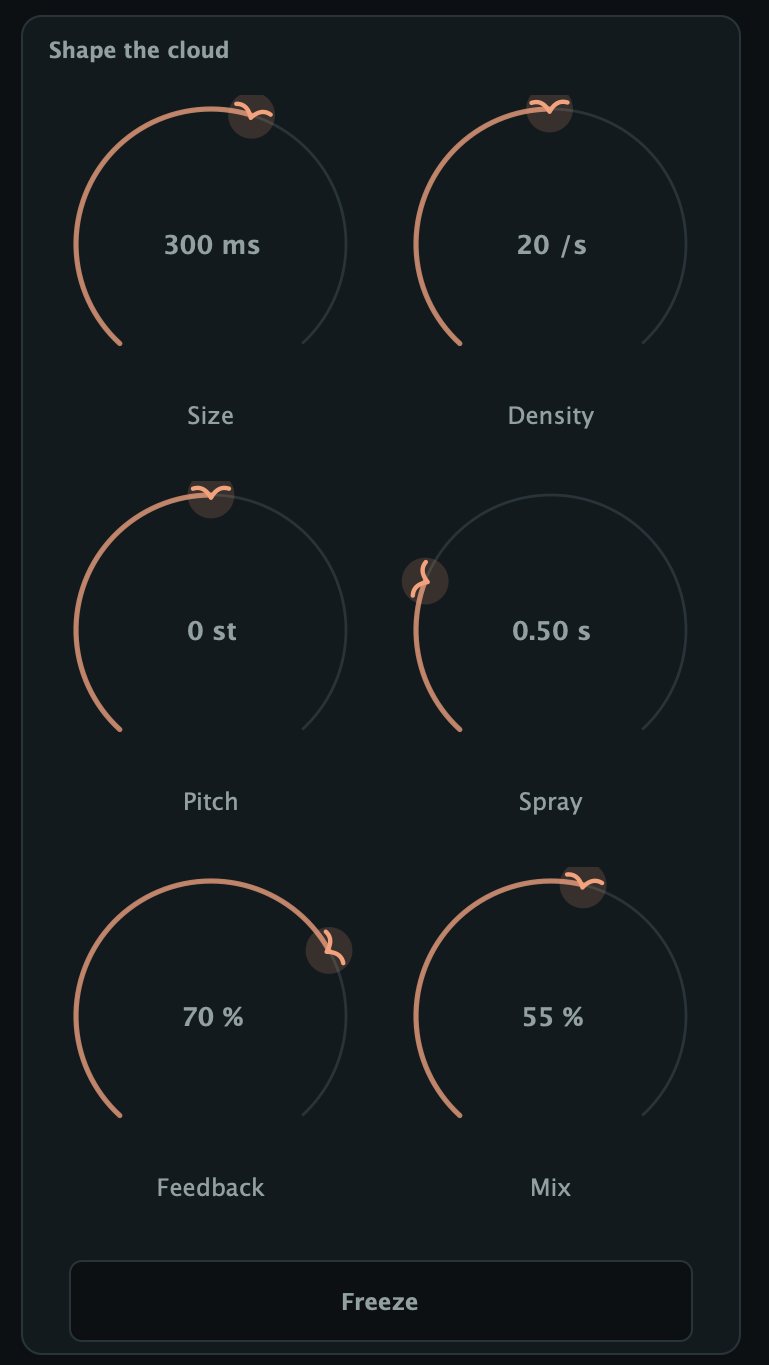
- Size (5 ms to 2 s): the length of each grain. Below about 30 ms grains buzz; around 100 to 300 ms the source is still recognisable; above half a second they blur into a slow cloud.
- Density (0.5 to 200 per second): how many grains are born each second. A few give separate echoes; dozens give a continuous texture.
- Pitch (-24 to +24 semitones): transposes every grain.
- Spray (0 to 8 s): scatters the grains around Position, from one focused moment to fragments of the whole recent past.
- Feedback (0 to 97 %): sends the grains back into the buffer, so the cloud grows on itself.
- Mix (0 to 100 %): the balance between your dry sound (0) and the grains (100 %).
Freeze, under the knobs, stops recording. The grains keep playing what is in the buffer, so you can stop the music and keep the cloud. The sustain pedal does the same.
The small knobs

Position (how far back grains start), Pitch Random (a random transposition per grain), Shimmer (the chance of a grain an octave up), Reverse (the chance of a backwards grain), Reverb (Reverb Mix) and Delay (Delay Mix). All are described on the Advanced page.
The Advanced page
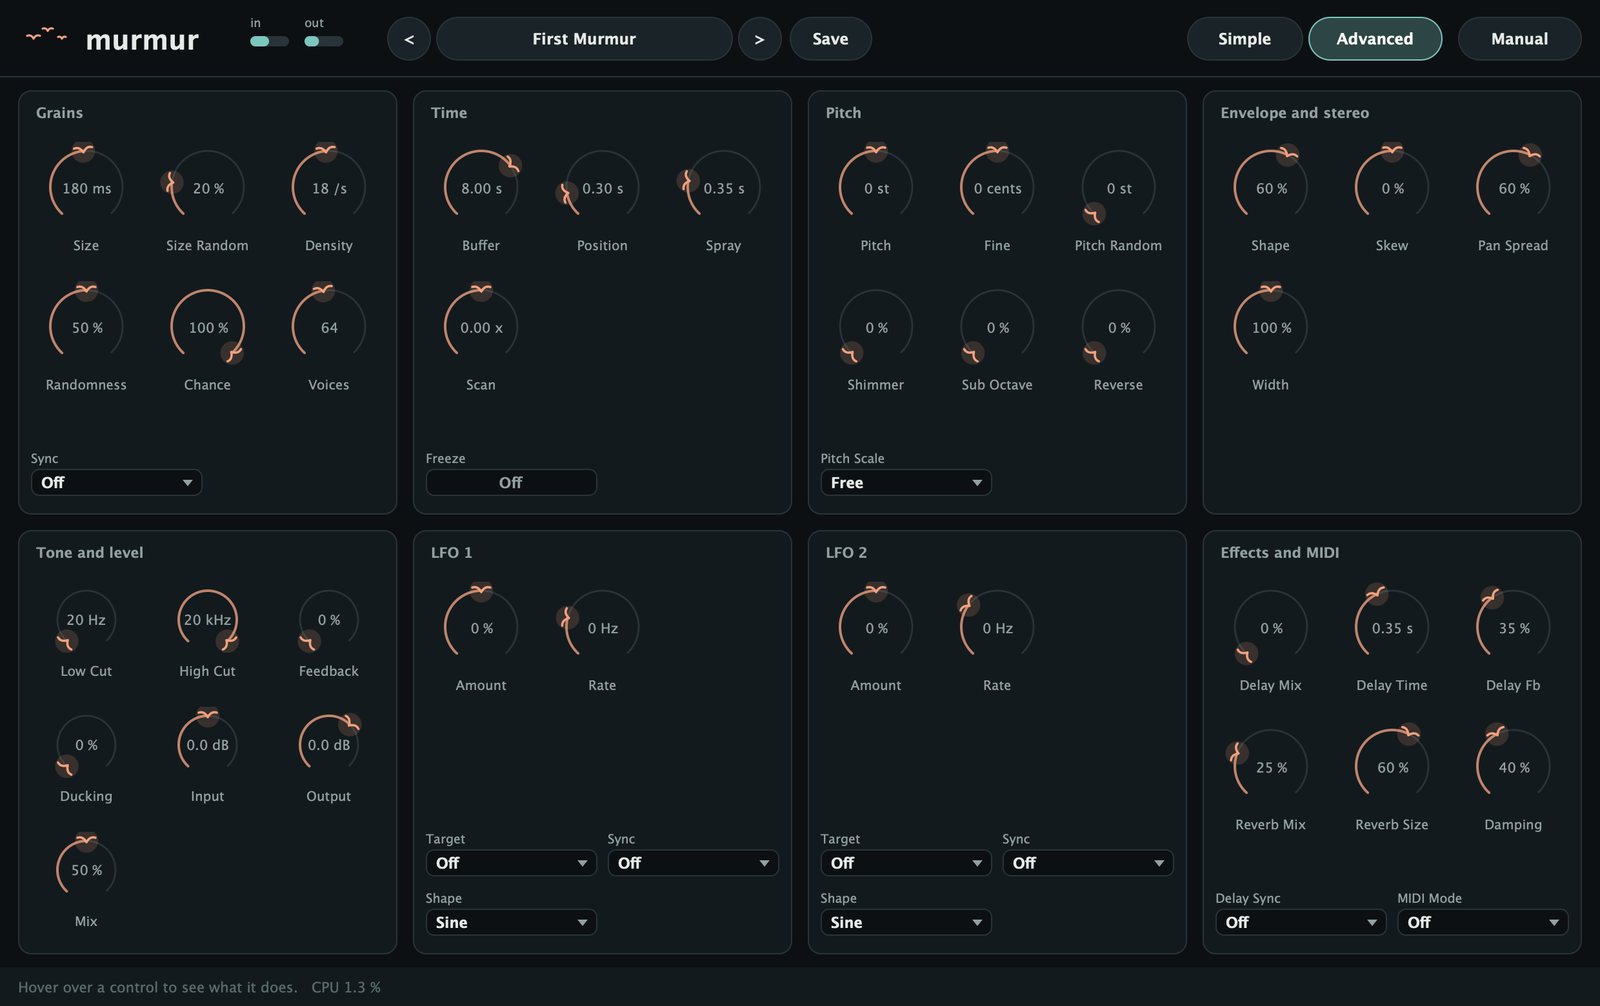
The Advanced page shows every parameter in eight panels: Grains, Time, Pitch, and Envelope and stereo on the top row; Tone and level, LFO 1, LFO 2, and Effects and MIDI below. The Simple page knobs are the same parameters, so a change on one page shows on the other.
Grains
| Control | Range | Default |
|---|---|---|
| Size | 5 ms to 2 s | 120 ms |
| Size Random | 0 to 100 % | 20 % |
| Density | 0.5 to 200 /s | 16 /s |
| Randomness | 0 to 100 % | 50 % |
| Chance | 0 to 100 % | 100 % |
| Voices | 8 to 128 | 64 |
| Sync | Off, 1 bar to 1/8 D | Off |
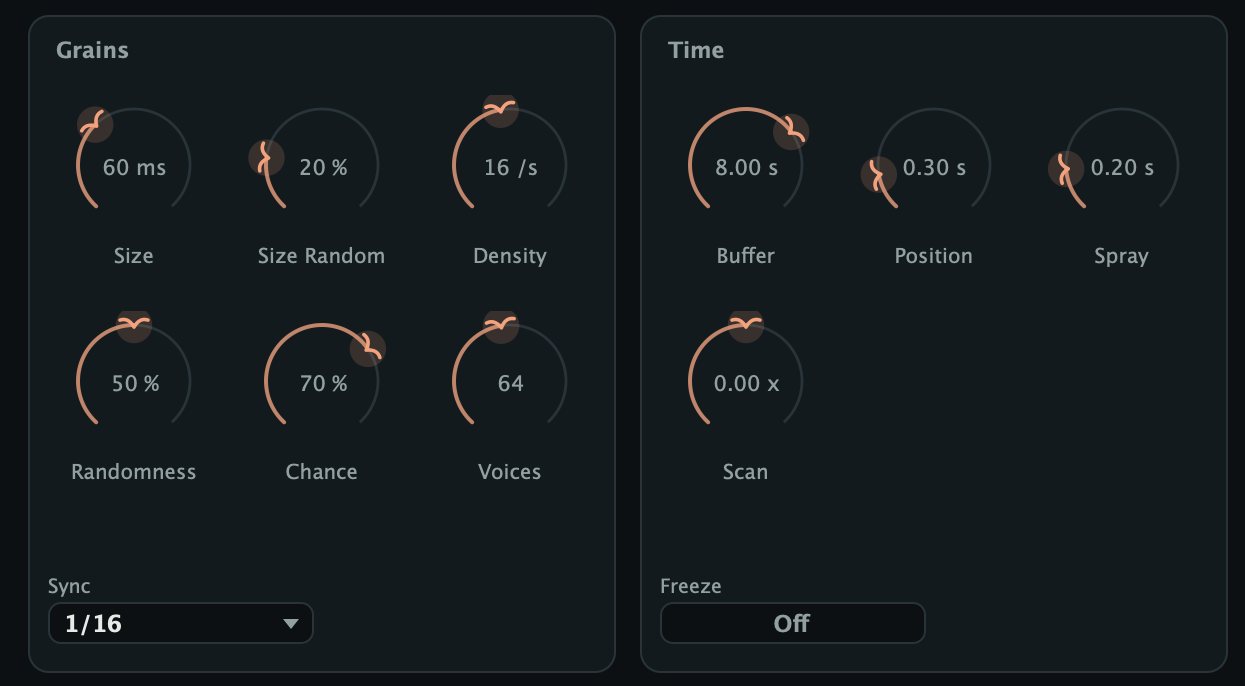
Size is the length of each grain. Short grains (5 to 40 ms) are clicks and buzzes, the raw material of glitch. Medium grains (60 to 300 ms) keep the character of the source. Long grains (half a second to two seconds) overlap into smooth washes.
Size Random gives each grain a random length around Size, up to an octave either way: at 100 % anything from half to twice Size. A little keeps a cloud from sounding mechanical.
Density is how many grains are born each second. Density times Size in seconds is how many overlap: at 16 per second and 120 ms about two, at 60 per second and 1 s about sixty. Murmur lowers each grain's level as the overlap grows, so thin and thick clouds sound about equally loud.
Randomness sets the spacing. At 0 grains come at even intervals, like a pulse (at high densities the pulse becomes a buzz with its own pitch). At 100 % the spacing is random, like rain. In between, Murmur mixes the two.
Sync puts the grains on the host's tempo grid instead of Density: one grain at the start of each step. The divisions are 1 bar (four beats), 1/2, 1/4, 1/8, 1/16, 1/32, the triplets 1/4 T and 1/8 T, and the dotted 1/4 D and 1/8 D. With Sync on, Density and Randomness are not used. Chance, which only works with Sync, is the probability that each step plays a grain.
Voices is the maximum number of grains at once. When the limit is reached, new grains are skipped until one ends. Lower it to save CPU or thin out a cloud. Presets do not change Voices and are saved without it, but it is stored with your project.
Time
| Control | Range | Default |
|---|---|---|
| Buffer | 0.5 to 16 s | 8 s |
| Position | 0 to 16 s | 0.30 s |
| Spray | 0 to 8 s | 0.20 s |
| Scan | -2 to +2 x | 0 |
| Freeze | Off, On | Off |
Buffer is how much recent audio the grains can reach and the horizon shows. Murmur always records the last 16 seconds; Buffer chooses how much of it the grains use. With Freeze on, Buffer is the length of the frozen loop, and you can change it while frozen to reveal more or less of the recorded memory.
Position is how far back grains start, in seconds behind the newest audio. At 0 the cloud follows you closely; at a few seconds it replays what you did a moment ago, like a granular echo. It cannot reach further back than Buffer or than the audio recorded so far. Grains transposed up read faster than the audio arrives, so Murmur starts them far enough back that they never catch up with the recording; that is why high clouds feel slightly behind.
Spray spreads the start of each grain at random up to that many seconds earlier or later than Position. At 0 every grain reads the same moment; at 0.2 to 1 s the cloud becomes a chorus of nearby moments; at several seconds it becomes a collage.
Scan moves the reading point on its own, in "times real time". It is meant for Freeze: see Freeze, Scan and time-stretch. Freeze is the same switch as on the Simple page, shown as Off or On.
Pitch
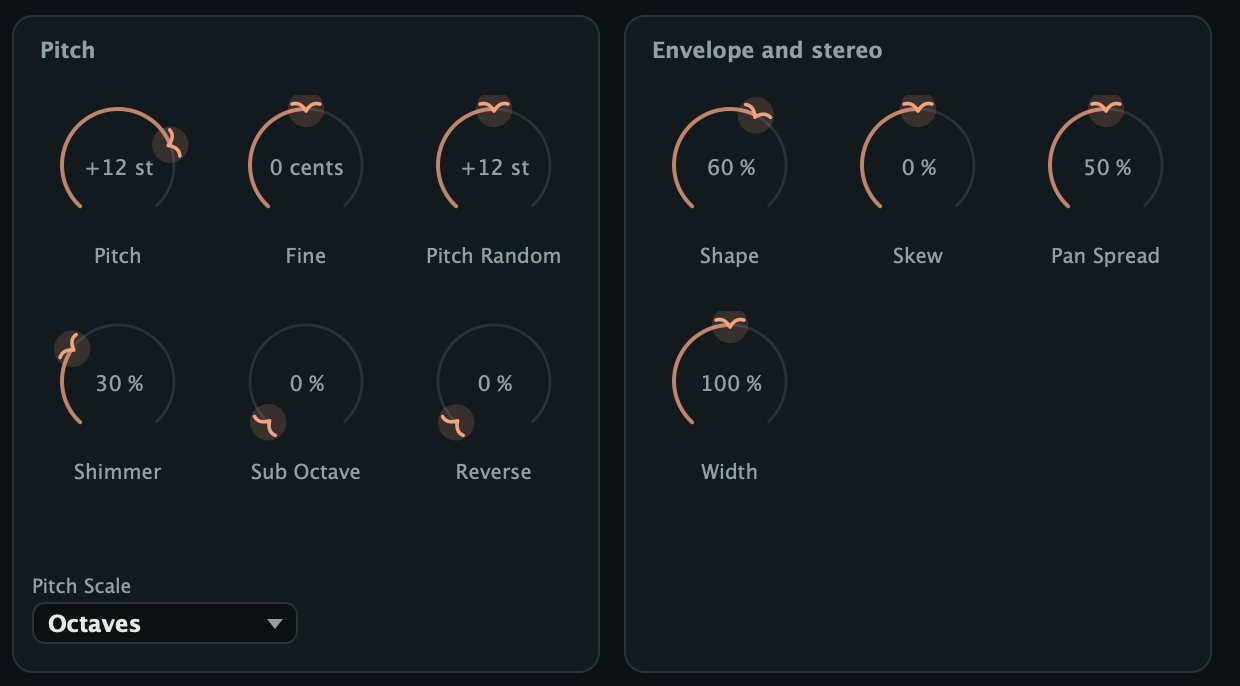
| Control | Range | Default |
|---|---|---|
| Pitch | -24 to +24 st | 0 st |
| Fine | -100 to +100 cents | 0 |
| Pitch Random | 0 to 24 st | 0 st |
| Shimmer | 0 to 100 % | 0 % |
| Sub Octave | 0 to 100 % | 0 % |
| Reverse | 0 to 100 % | 0 % |
| Pitch Scale | Free and 7 scales | Free |
Pitch transposes every grain in semitones without changing the speed at which grains move through the buffer, so a voice an octave up still sings at its own tempo. Fine tunes in cents.
Pitch Random gives each grain a random transposition up or down by up to this many semitones, snapped to the intervals chosen in Pitch Scale (see Pitch and scales). Small values on Free detune the grains slightly against each other; large values with a scale turn the cloud into a chord.
Shimmer is the chance that a grain plays an octave higher; with Feedback it gives the classic rising shimmer. Sub Octave is the chance that a grain plays an octave lower, for weight. The two are drawn independently, so a grain can get both and land back at the original pitch. Reverse is the chance that a grain plays backwards: at 30 to 50 % the cloud gets smeared, at 100 % with a positive Skew every grain swells like a tape played backwards.
The total transposition of a grain is limited to four octaves up or down.
Envelope and stereo
| Control | Range | Default |
|---|---|---|
| Shape | 0 to 100 % | 60 % |
| Skew | -100 to +100 % | 0 % |
| Pan Spread | 0 to 100 % | 50 % |
| Width | 0 to 200 % | 100 % |
Each grain fades in and out; that fade is its envelope. Shape sets how soft the fades are: at 100 % a smooth bell for seamless clouds, at 0 almost square, clicky and rhythmic, ideal for stutters. Even at 0 every grain gets at least 2 ms of fade at each edge.
Skew moves the peak of the envelope. Negative values move it to the start (fast attack, long decay, like a pluck); positive values to the end (a slow swell that stops suddenly, like a sound played backwards). At the extremes the peak sits at 5 % or 95 % of the grain.
Pan Spread places each grain at a random point across the stereo field, up to this far from the centre. Width is the stereo width of what each grain reads: 0 mono, 100 % as recorded, 200 % wider. Width shapes each grain; Pan Spread places it.
Tone and level
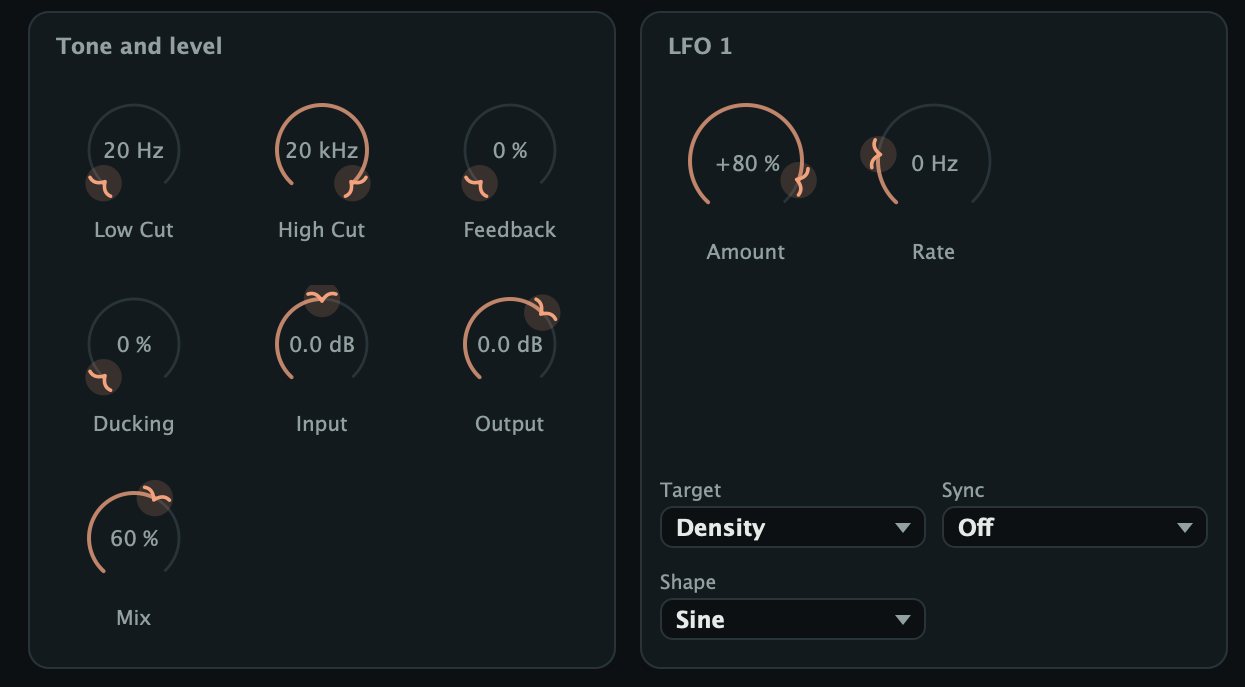
| Control | Range | Default |
|---|---|---|
| Low Cut | 20 Hz to 2 kHz | 20 Hz |
| High Cut | 500 Hz to 20 kHz | 20 kHz |
| Feedback | 0 to 97 % | 0 % |
| Ducking | 0 to 100 % | 0 % |
| Input | -24 to +24 dB | 0 dB |
| Output | -24 to +12 dB | 0 dB |
| Mix | 0 to 100 % | 50 % |
Low Cut and High Cut are gentle filters (6 dB per octave) on the grains only. Low Cut at 150 to 300 Hz keeps a cloud from muddying your bass; High Cut at 4 to 8 kHz pushes it into the distance. The grains are filtered before they are fed back, so these filters also shape how Feedback builds.
Feedback sends the grains back into the buffer (see Feedback and Shimmer). It has no effect while Freeze is on, because nothing is recorded.
Ducking lowers the grains while the input is loud, so the cloud blooms in the gaps between phrases. It reacts fast, recovers in about 0.3 s, and ducks fully when the input peaks at about -12 dBFS. It acts on the grains, the delay and the reverb, never on the dry signal.
Input sets the level going into Murmur: the buffer and the dry signal both follow it. Output sets the final level of everything. Mix crossfades between the dry input and the grains: at 50 % you hear half of each.
LFO 1 and LFO 2
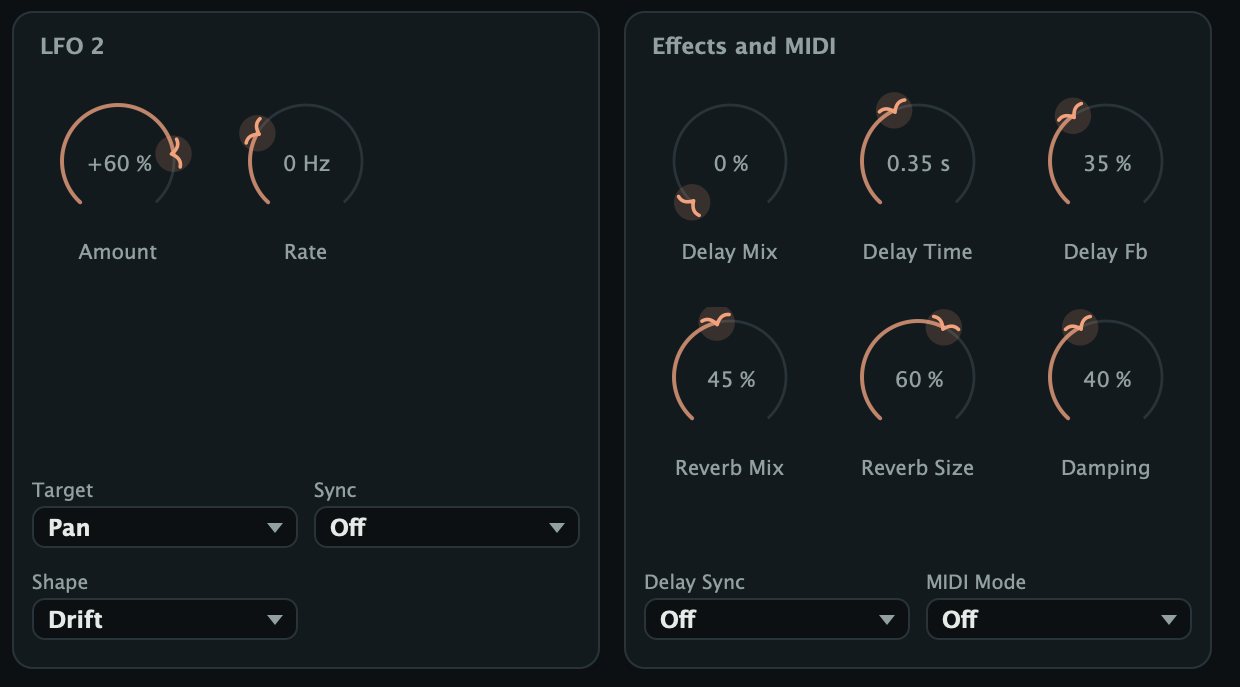
| Control | Range | Default |
|---|---|---|
| Target | Off and 9 targets | Off |
| Amount | -100 to +100 % | 0 % |
| Rate | 0.01 to 20 Hz | 0.15 Hz, 0.40 Hz |
| Sync | Off, 1 bar to 1/8 D | Off |
| Shape | Sine, Triangle, Ramp, Drift, Step | Sine |
The two LFOs are identical (LFO 1 starts at 0.15 Hz, LFO 2 at 0.40 Hz). Target chooses what the LFO moves, Amount how much and in which direction, Rate how fast, Sync locks the speed to the host tempo, and Shape chooses the wave. See Modulation with the LFOs.
Effects and MIDI
| Control | Range | Default |
|---|---|---|
| Delay Mix | 0 to 100 % | 0 % |
| Delay Time | 0.02 to 2 s | 0.35 s |
| Delay Fb | 0 to 95 % | 35 % |
| Delay Sync | Off, 1 bar to 1/8 D | Off |
| Reverb Mix | 0 to 100 % | 0 % |
| Reverb Size | 0 to 100 % | 60 % |
| Damping | 0 to 100 % | 40 % |
| MIDI Mode | Off, Pitch, Gate | Off |
The delay and the reverb are explained in Delay and reverb, and MIDI Mode in MIDI modes and the sustain pedal.
Freeze, Scan and time-stretch
When Freeze is on, recording stops and the buffer becomes a fixed snapshot of the last Buffer seconds. The grains keep reading from it with all their settings, so you can change Size, Pitch, Spray and the rest on a sound that no longer exists in your track.
- Freeze keeps what was recorded before you pressed it. Press it while the sound is still ringing.
- While frozen, Position, Spray and Scan wrap around: a frozen buffer behaves like a loop of exactly Buffer seconds.
- If the buffer holds less audio than Buffer, part of the loop is silent and grains landing there are silent too. Lower Buffer to the length of the sound you froze.
- Murmur starts with an empty buffer, and your DAW may clear it when it restarts audio or changes sample rate. Freezing an empty buffer gives silence.
- Factory presets always load with Freeze off, so you never freeze an empty buffer by accident. A user preset saved with Freeze on loads with it on.
Scan and time-stretch
With Freeze on, Scan turns Murmur into a time-stretcher:
| Scan | With Freeze |
|---|---|
| +1.00 x | moves through the sound at its original speed |
| +0.50 x | half speed: twice as long |
| +0.10 x | ten times as long |
| 0 | stays on one moment: an endless hold |
| -0.05 x | twenty times as long, backwards |
| +2.00 x | twice as fast |
Pitch stays where Pitch puts it; only the speed of travel changes. For the smoothest stretch, use long grains (300 ms to 1 s), Shape near 100 %, a Density of 20 to 40 per second and a small Spray (0.05 to 0.2 s). Shorter grains and more Spray give a grainier stretch.
When you set Scan back to 0, the reading point stays where Scan left it; Position still offsets it from there. On the flock view, grains drift away from the light band as Scan moves them.
Without Freeze, Scan makes the reading point sweep from Position towards the newest audio (positive) or the oldest (negative), jumping back about once per Buffer length. It can make a cloud wander, but it is mostly a Freeze tool.
Feedback and Shimmer
Feedback takes the grains (after Low Cut and High Cut, before the delay and reverb) and records them back into the buffer together with the input. New grains then read a mix of what you played and what the grains already did, so the sound thickens and keeps evolving after you stop.
- From 0 to 30 % it adds density and a soft halo.
- From 40 to 70 % the cloud grows on itself and sustains for many seconds.
- Above 80 % it becomes a self-sustaining texture that takes a long time to die away.
The returning signal passes through a DC blocker and a soft clipper, so peaks round off instead of exploding: the engine's tests run Feedback at 97 % with Shimmer at 50 % for 20 seconds and the output stays bounded. It can still get loud, so keep a hand on Output. Feedback multiplies whatever the grains do: with Pitch at +7 each pass climbs another fifth, with Pitch Random on a scale the chord fills in.
The rising shimmer
Every grain that plays an octave up goes back into the buffer, where some of its grains go another octave up: the sound rises in a slow spiral of octaves, like a choir appearing out of a guitar chord. Start with Shimmer at 30 to 50 %, Feedback at 50 to 75 %, Size 250 to 400 ms, Spray around 0.5 s, High Cut at 6 to 10 kHz and a generous Reverb Mix. A little Sub Octave adds weight underneath, as in Cathedral Bloom. If the top gets piercing, lower High Cut before Feedback.
Sync and rhythm
With Sync on a division, grains play on your DAW's grid, one at the start of each step, following the host's song position while it plays. When the host is stopped, Murmur keeps a free clock running at the host's tempo, so you can still hear the rhythm while you set it up. The engine's tests check that at 120 BPM on 1/8, Murmur plays 16 grains in 4 seconds.
To make a rhythm that sounds like one:
- Keep Size shorter than the step. At 120 BPM a sixteenth lasts 125 ms, so grains of 50 to 100 ms leave gaps.
- Set Shape low (0 to 20 %) and Skew negative for sharp attacks.
- Keep Spray small for a stutter that repeats the same moment, or larger for a granular sequencer that grabs a new fragment each step.
- Lower Chance to 50 to 80 % to break the pattern up; each step decides on its own.
- Add Pitch Random on Octaves for jumping hits, or Reverse for backwards ones.
The delay and the LFOs can follow the tempo too: 1/8 grains with a 1/8 D delay make the dotted bounce of the Eighth Notes preset. In Gate mode with Sync on, grains play on the steps only while a note is held.
Pitch and scales
Each grain's pitch is built from Pitch and Fine, then the MIDI note (in the MIDI modes), then a random interval from Pitch Random, then the Shimmer and Sub Octave octaves.
Pitch Scale acts only on the random part. Murmur draws a random value up to Pitch Random either way and snaps it to the nearest interval of the scale. The scale is built on the grain's own pitch, not on a fixed key: Major gives the root, major third and fifth of whatever note your source plays. Pitch, Fine and MIDI notes are never snapped.
| Pitch Scale | The random part lands on |
|---|---|
| Free | any value |
| Semitones | whole semitones |
| Octaves | 0, 12 and 24 semitones up or down |
| Fifths | octaves and the fifth above each |
| Major | root, major third, fifth |
| Minor | root, minor third, fifth |
| Pentatonic | root, 2nd, major 3rd, 5th, 6th |
| Whole tone | steps of two semitones |
Pitch Random has to be wide enough to reach the intervals: on Octaves, anything below 6 semitones snaps back to 0, so use at least 12. At 24 on Octaves, about a quarter of the grains stay at the original pitch, half land one octave away and a quarter two octaves away: that is Octave Shower.
Combinations to try: Free with 0.1 to 0.5 st for a chorus (Starling Cloud); Fifths with 12 to 19 st for open drones (Fifths Drone); Major or Minor with 12 st for a sparkle of chord tones (Major Sparkle, Minor Mist); Pentatonic with 12 st for chimes that never clash (Pentatonic Wind); Semitones with 24 st and tiny grains for chromatic chaos (Bit Swarm).
Modulation with the LFOs
Each LFO moves one parameter up and down around where its knob is set. The knobs do not move on screen; the modulation happens inside.
- Sine: a smooth swing. Triangle: straight lines with sharper turns. Ramp: falls from top to bottom, then jumps back up.
- Drift: glides smoothly to a new random value each cycle, the most natural choice for slow wandering.
- Step: jumps to a new random value each cycle and holds it.
Rate goes from 0.01 Hz (one cycle in 100 seconds) to 20 Hz. With Sync on a division, one cycle lasts that division at the host tempo and Rate is ignored. Negative Amounts turn the wave upside down.
| Target | At full Amount |
|---|---|
| Position | up to half the Buffer either way |
| Spray | from none to twice the setting |
| Size | from a quarter to four times |
| Density | from a quarter to four times |
| Pitch | 12 semitones up and down |
| Pan | widens and narrows Pan Spread |
| Tone | High Cut 3 octaves, Low Cut 1.5 octaves |
| Mix | 50 % either way |
| Feedback | 50 % either way |
Position, Spray, Size, Pitch and Pan are read when each grain is born and kept for its whole life, so the modulation shows across the stream of grains. Density changes how often grains are born. Tone, Mix and Feedback move continuously.
Ideas: Drift on Position at a slow Rate for a cloud that wanders through the buffer (Tape Scatter); Sine on Density at 0.1 Hz for a cloud that breathes (Breathing Cloud); Drift on Tone for an underwater sweep (Underwater); Step on Pitch at 4 Hz for random jumps (Broken Radio); Triangle on Pan synced to 1 bar for a cloud that widens with the music.
Delay and reverb
After the tone filters, the grains go through a delay and then a plate reverb. Both process only the grains and are off, costing nothing, while their Mix is at 0. Ducking acts after them, so a ducked cloud ducks its echoes and reverb too.
The delay is a ping-pong echo: the first repeat comes from the left and each following one crosses to the other side, a little darker each time.
- Delay Mix: how much echo is added; the grains stay at full level.
- Delay Time (0.02 to 2 s): the time between repeats when Delay Sync is off. Changing it glides smoothly, with a tape-like bend.
- Delay Fb: around 30 % gives a few repeats, 70 % or more a long trail.
- Delay Sync: the time in notes of the host tempo; Delay Time is then ignored. Synced times are limited to 4 seconds.
The reverb is a dense, smooth plate. Reverb Mix sets how much is added, Reverb Size the length of the tail (above 80 % it lasts many seconds), and Damping how quickly the highs die out.
MIDI modes and the sustain pedal
Murmur listens to notes and to the sustain pedal (see Sending MIDI to Murmur). MIDI Mode decides what notes do. On Off they are ignored, but the pedal still works.
Pitch
The notes you play set the grains' pitch. Middle C (MIDI note 60, called C3 in Ableton Live and C4 in other DAWs) leaves the grains at their original pitch; each semitone away transposes them one semitone. With several notes held, each new grain picks one of them at random, so a chord on the keyboard becomes a chord of grains. Up to 16 held notes are used.
- Velocity sets the level of the grains born from that note, from about a third of full level to full.
- Pitch, Fine, Pitch Random, Shimmer and Sub Octave still apply on top.
- With no note held, grains play at their normal pitch: Pitch mode transposes, it does not silence.
- Playing grains keep their pitch; new notes appear as new grains are born. Higher Density follows your playing faster.
The transposition is relative to your source. If the source sits on C, the keys sound the notes you press. If not, set Pitch so the source lands on C: for a source in A, -9 st (or +3 st an octave up).
Gate
Grains are born only while a note is held. Release the keys and no new grains start; the playing ones finish and the effects ring out. With Sync off, the first grain starts the moment you press a key; with Sync on, grains play on the steps while a key is held. Gate also transposes like Pitch mode, so hold middle C for gating only.
The sustain pedal
The sustain pedal (controller 64) holds Freeze while it is down, in every MIDI mode: play a chord, step on the pedal while it rings, and play something else over the frozen cloud. The pedal freeze is separate from the Freeze button: the button stays as it was, but the flock view says frozen and the horizon stops moving. If either is on, Murmur is frozen. All Notes Off and All Sound Off release held notes; Reset All Controllers releases the pedal; bypassing Murmur releases both.
Presets
Click the preset name in the top bar to open the preset menu, one submenu per category, or step through all presets with < and >. Loading a preset sets every parameter except Voices; the buffer is not cleared, so the new settings work on the audio already recorded.
To save, click Save, type a name and press Save. The preset goes into the User category; saving with an existing name replaces it. User presets are files you can copy or share:
- macOS:
~/Library/Application Support/Audio Tools/Murmur/Presets - Windows:
%APPDATA%\Audio Tools\Murmur\Presets
Your project stores the full state of Murmur anyway, including the preset name, so you do not need a preset to keep a sound in a song.
| Category | Presets | Feed them |
|---|---|---|
| Clouds | First Murmur, Slow Fog, Starling Cloud, Dust Motes | anything sustained |
| Shimmer | Choir Rising, Glass Halo, Cathedral Bloom | guitar, keys, voice |
| Stretch | Stretch Ten Times, Reverse Glacier, Held Chord | a chord, then Freeze |
| Rhythm | Eighth Notes, Sixteenth Stutter, Triplet Rain, Gated Swells | drums, with the host playing |
| Pitch | Octave Shower, Major Sparkle, Minor Mist, Pentatonic Wind, Fifths Drone, Down Below | melodic parts |
| Texture | Tape Scatter, Reverse Swell, Granular Wash, Underwater, Breathing Cloud | pads, ambiences |
| Glitch | Bit Swarm, Broken Radio, Skipping CD | beats, voices |
| MIDI | Play the Cloud, Gated Choir | a source plus a MIDI track |
The Stretch presets expect you to press Freeze. Gated Choir is silent until you play notes.
Recipes
Vocal cloud
- Create a return track with Murmur and send the vocal to it.
- Load First Murmur and set Mix to 100 %.
- Set Size to 250 ms, Density to 20 /s, Spray to 0.6 s and Pitch Random to 0.2 st on Free.
- Set Low Cut to 250 Hz, High Cut to 8 kHz, Reverb to 30 % and Ducking to 50 %.
- Bring the return up until you feel the halo more than hear it.
Shimmer pad from a guitar
- Load Choir Rising on a clean guitar and play slow chords. Octaves rise above them within seconds.
- For more lift raise Shimmer towards 60 %; for a longer bloom raise Feedback towards 80 %.
- If the top gets harsh, lower High Cut to 6 kHz.
- Keep Mix at 40 to 60 % for guitar plus pad, or 100 % for the pad alone.
Time-stretch a chord with Freeze and Scan
- Load Stretch Ten Times and set Buffer a little longer than your chord, for example 4 s.
- Play the chord and, while it rings, press Freeze. It unfolds ten times slower at its original pitch.
- Set Scan to 0.05 for twenty times slower, or -0.1 to play it backwards.
- Set Scan to 0 to hold one moment, and move Position to choose which one.
Rhythmic stutter on drums
- Load Sixteenth Stutter on a drum loop and start the host.
- Set Spray to 0 and Position to 0.25 s so every hit repeats the same fragment.
- Use Chance 50 % for a broken pattern or 100 % for a roll; Pitch Random 0 for a pure stutter.
- Automate Mix from 0 to 70 % at the end of a phrase for a fill.
Chords of grains with MIDI Pitch mode
- Put Murmur on a sustained sound and route a MIDI track to it. Load Play the Cloud.
- If the source is not on C, set Pitch to its distance to C (for A, -9 st).
- Hold a chord: each grain picks one of the notes and the cloud becomes the chord.
- Raise Density to 40 /s to follow chord changes faster. For a playable frozen sample, press Freeze or the pedal on a good moment first.
Ducked ambience on a return
- Load Cathedral Bloom on a return, set Mix to 100 % and send a piano or vocal to it.
- Set Ducking to 70 %: the cloud steps back while you play and blooms in the pauses.
- Set Low Cut to 200 Hz, and lower Feedback to 50 % if it lingers too long.
Lo-fi glitch
- Load Broken Radio on a beat or a vocal: a narrow band and short random grains.
- Raise LFO 1 Amount for more chaos, or set its Shape to Drift for a steadier warble.
- Set Shape to 0 % for harder clicks and Voices to about 24 to thin it out.
Octave shower
- Load Octave Shower on a melodic line.
- Raise Shimmer to 30 % to favour the upper octaves, or Sub Octave for the lower ones.
- Set Pan Spread to 100 % and Reverb to 50 % for a wide, starry cloud; lower Pitch Random to 12 st for one octave each way.
Frozen drone with the sustain pedal
- Load Fifths Drone and route a MIDI track with your keyboard and pedal to Murmur (MIDI Mode can stay Off).
- Play a chord and press the pedal while it rings: it freezes into a drone of fifths and octaves.
- Play over it; release the pedal to capture a new chord.
Tips
- Start with sustained, simple material: a held note shows clearly what each control does.
- If the birds are not where you expect, look at Position, Spray and Scan.
- For pads, raise Shape and Size; for rhythms and glitches, lower them.
- Size times Density is the overlap: raise either for a thicker cloud, lower either if it turns to mush.
- Automate Freeze to catch exact moments, such as the last chord of a section.
- Save variations as you go: granular settings are easy to lose.
Troubleshooting
No grains, or no sound
- Mix at 0 % plays only the dry signal.
- MIDI Mode on Gate plays grains only while a note is held.
- In the standalone, the input starts muted: untick Mute audio input in Options, Audio/MIDI Settings.
- If the flock shows no waveform, no audio reaches Murmur; check the in meter and the track's input.
Freeze gives silence or holes
The buffer was empty when you froze it, or the sound was shorter than Buffer. Lower Buffer to the length of the sound, or press Freeze while it still rings.
The sound keeps going, or builds up
Freeze, the sustain pedal, Feedback or a long reverb keep it alive. Turn Freeze off, release the pedal, lower Feedback (then High Cut and Output), or lower Reverb Size. If the Freeze button is off but the flock view says frozen, the pedal is down; bypassing releases it.
Clicks
Short grains with low Shape click on purpose. For smooth clouds raise Shape to 50 % or more and Size to 60 ms or more, and bring an extreme Skew towards 0.
High CPU
The cost grows with the grains playing at once, about Density times Size, up to Voices. The help bar shows the load. Lower Voices, Density or Size. Delay and reverb cost nothing at Mix 0. As a reference, 128 one-second grains with delay and reverb at 48 kHz take about 2.5 % of one core on an Apple M4.
Sync or MIDI do not respond
Sync follows the host's position only while it plays; with Chance below 100 % some steps are skipped. For MIDI, check MIDI Mode and the routing: the flock shows "notes held" when notes arrive. Out-of-tune notes in Pitch mode mean the source is not on C; adjust Pitch.
Specifications
| Item | Value |
|---|---|
| Type | Real-time granular audio effect with MIDI input |
| Formats | VST3, Audio Unit music effect (macOS), standalone |
| Systems | macOS 11 or later (universal), Windows 10 or 11 (64-bit) |
| Inputs and outputs | Mono or stereo in, mono or stereo out |
| Latency | None |
| Buffer | Records the last 16 s; grains use 0.5 to 16 s |
| Grains | Up to 128 at once (Voices 8 to 128) |
| Grain size | 5 ms to 2 s, random variation up to an octave |
| Density | 0.5 to 200 grains per second, even to random spacing |
| Tempo sync | 10 divisions, 1 bar to 1/32, triplets and dotted, chance per step |
| Pitch | -24 to +24 st, fine tuning, random up to 24 st, total within 4 octaves |
| Pitch scales | Free, Semitones, Octaves, Fifths, Major, Minor, Pentatonic, Whole tone |
| Per grain | Shimmer, sub octave and reverse chances, envelope shape and skew, pan, width |
| Tone | Low cut 20 Hz to 2 kHz, high cut 500 Hz to 20 kHz, 6 dB per octave |
| Feedback | Up to 97 %, through a DC blocker and a soft clipper |
| Modulation | 2 LFOs, 5 shapes, 9 targets, 0.01 to 20 Hz or tempo-synced |
| Effects | Ping-pong delay up to 2 s (4 s synced), plate reverb, ducking |
| MIDI | Pitch and Gate modes, 16 held notes, velocity, sustain pedal holds Freeze |
| Presets | 30 in eight categories, plus your own |
| Tail reported | 20 s |
Checked on the engine:
| Check | Result |
|---|---|
| 128 grains of 1 s, delay and reverb, 48 kHz | About 2.5 % of one core on an Apple M4 |
| Pitch +12 on a 220 Hz tone | Within 15 Hz of 440 Hz |
| Freeze with the input silent | The frozen buffer keeps sounding |
| Sync 1/8 at 120 BPM for 4 s | 16 grains, one per eighth note |
| Feedback 97 % with Shimmer 50 % for 20 s | Output stays bounded |
| Gate mode without notes | Silent |
| 44.1, 96 and 192 kHz, blocks of 1 to 4096 samples | Finite output with level everywhere |
| 60 random combinations of every parameter | Always finite, no level explosions |